
Ever wished you could plan an entire social media campaign—from post schedule to captions—in one click?
In this guide, we’ll walk you through how to build an AI-powered Social Media Campaign Planner inside Diaflow, using a powerful workflow template that connects OpenAI, Google Sheets, and your custom inputs. This planner will automatically generate a full posting schedule and write platform-optimized captions, instantly exporting everything to a ready-to-use Google Sheet.
Let's break down this time-saving automation, step by step!
Table of Contents
- Overview: What the Planner Achieves
- Step 1: Setting Up Your Campaign Inputs (trigger node)
- Step 2: Generating the Structured Content Plan (openai-0 node)
- Step 3: Processing Each Post Individually (loop and json-formatter nodes)
- Step 4: Writing Engaging Post Captions (openai-1 node)
- Step 5: Preparing Data for Spreadsheet Export (openai-2 node)
- 📢 CRITICAL NOTE: Preparing Your Google Sheet
- Step 6: Sending the Plan to Google Sheets (google_sheets_p-0 node)
Overview: What the Planner Achieves
This template is designed to take simple campaign details (your brand name, content goals, timeline, etc.) and convert them into a fully structured, ready-to-use content calendar.
The main flow is: Input (Form) -> Plan (Schedule & Topics) -> Create (Captions) -> Output (Google Sheet)
The core function is to leverage the power of the OpenAI node multiple times:
- First, to generate the strategic plan.
- Second, to write the creative copy.
- Third, to format the final data for export.
This multi-step approach ensures your campaign is both strategically sound and creatively engaging.
Step 1: Setting Up Your Campaign Inputs (trigger node)
Think of the trigger node as the custom form you fill out to kick off your automation. This is where the workflow gathers all the necessary information to create your plan.
Node: trigger (Inputs)
Purpose: To collect all the essential data about your campaign.
Key Inputs Collected:
- brand_name (e.g., Diaflow.io)
- content_goals (e.g., Brand Awareness, Lead Generation)
- industry (e.g., SaaS / Tech, Fintech)
- tone_style (e.g., Funny, Professional, Educational)
- main_platforms (e.g., LinkedIn, Facebook, Instagram)
- key_topics_themes (e.g., AI automation, Case study)
- campaign_timeline (The start and end dates)
- posting_frequency (e.g., 2 post/week, Every day post/week)
💡 Tip: Make sure your content_goals and tone_style are detailed! The AI in the next step will use these to shape the entire strategy.
Step 2: Generating the Structured Content Plan (openai-0 node)
This is where the magic of AI planning happens! The data from your trigger node is fed into this OpenAI node, which acts as the 'Social Media Strategist.'
Node: openai-0
Purpose: To create a full, scheduled posting plan in a structured JSON format.
Key Task: The prompt instructs the AI to take the brand details, timeline, and frequency, and return a JSON array where each object is a planned post.
Data Generated (Example JSON Structure):
{
"Publishing Date": "2025-10-20",
"Platform": "LinkedIn & Facebook",
"Title": "How AI Automation Saves Time...",
"Main Topic": "Workflow Optimization",
"Goal": "Educate Audience",
"Tone & Style": "Professional and Insightful",
"Industry": "SaaS / Technology",
"Hashtags": "#AI #Automation #Workflow..."
}
This structured output is crucial because it allows the rest of the workflow to process each post idea systematically.
Step 3: Processing Each Post Individually (loop and json-formatter nodes)
The plan created in Step 2 is a single list of many posts. We need to handle each post one-by-one to write its unique caption. This is the job of the loop and json-formatter nodes.
Node: loop-0
Purpose: To iterate through the array of structured posts created by openai-0. The loop runs once for every planned post, isolating the data for that specific post.
Node: json-formatter-0
Purpose: Ensures the data for the single post currently being processed is clean, validated JSON before moving to the next creative step.
Step 4: Writing Engaging Post Captions (openai-1 node)
Now that we have the raw data for one post (date, title, platform, topic), we send it to a second OpenAI node, which takes on the role of the 'Copywriter.'
Node: openai-1
Purpose: To write a single, high-quality social media caption optimized for the specified platform(s) (e.g., LinkedIn and Facebook).
Key Task: The prompt provides strict "Writing Guidelines," including word count, tone consistency, using the provided title as a hook, and a fixed Call-to-Action (CTA):
👉 Stop wasting time. Start automating smarter with Diaflow today.
Output: A clean block of text containing the full, ready-to-post caption and hashtags.
⚠️ Common Mistake: If your captions look too generic, check the prompt in openai-1. You can customize the tone and style instructions here (e.g., "Use 3-5 emojis" or "Keep a witty tone").
The caption and the original post data are then combined by the loop-output-0 node, ready for the final formatting.
Step 5 & 6: Preparing Data and Exporting to Google Sheets (openai-2 and google_sheets_p-0)
The final steps are all about preparing the clean data and sending it where it belongs—your content calendar spreadsheet!
Step 5: Final Data Formatting
Node: openai-2
Purpose: To convert the completed post data (structured plan + written caption) into the exact format required by Google Sheets: a JSON array of arrays.
Output Requirement: The AI is instructed to return a row-based JSON, maintaining a specific column order:
[ "Publishing Date", "Platform", "Title", "Main Topic", "Goal", "Tone & Style", "Industry", "Post" ]
Step 6: Direct Export
Node: google_sheets_p-0 (Google Sheets)
Purpose: To automatically add all the prepared rows to your specified Google Sheet.
Key Action: google_sheets-add-multiple-rows
This final step removes the need for any manual copy-pasting, turning a multi-hour planning task into a one-click operation.
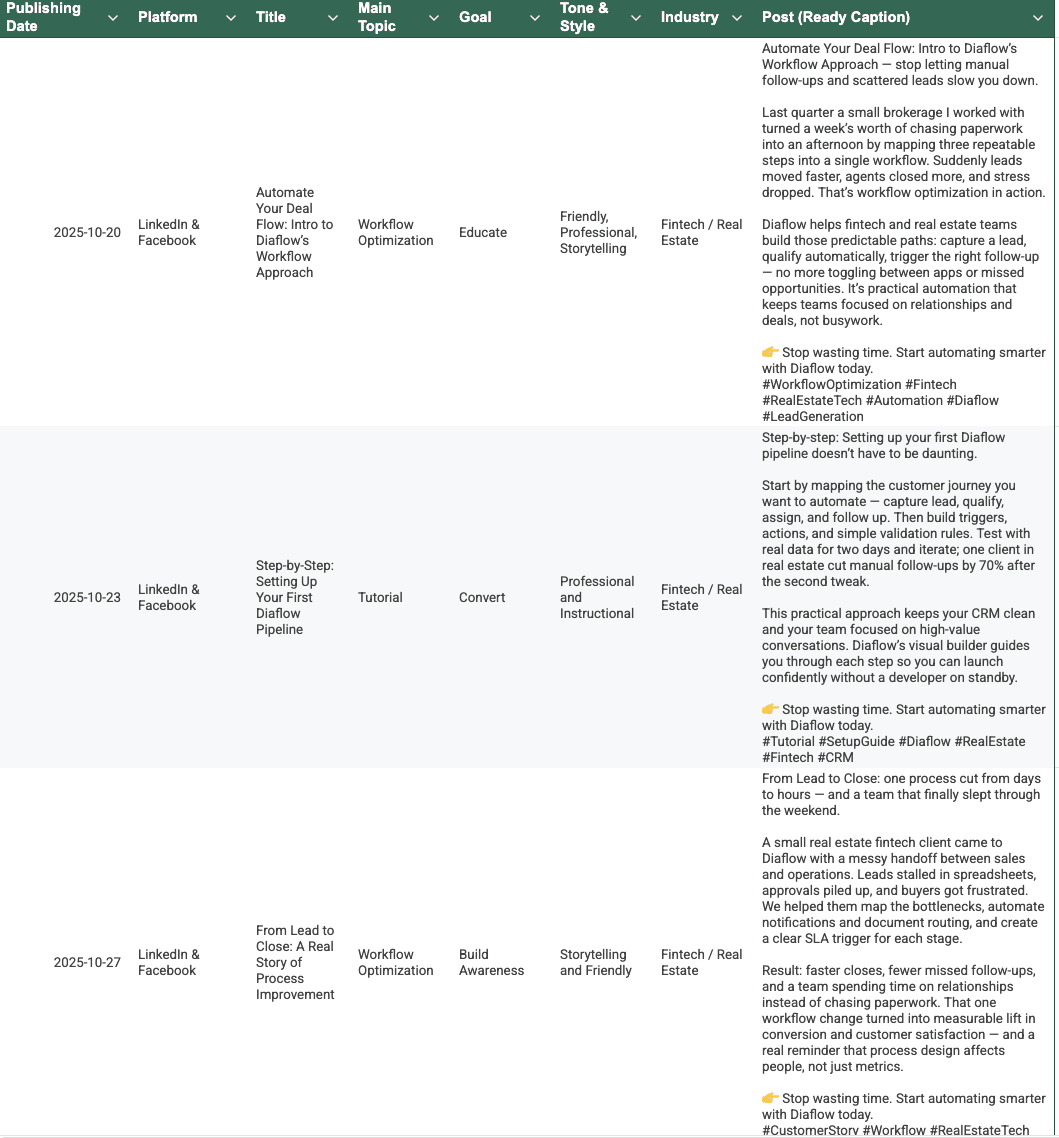
Final Result
The workflow culminates in the Google Sheets connector, which automatically populates your spreadsheet.
The final Google Sheet will contain a completely filled-out content calendar with columns exactly matching the data formatted in openai-2:
Checklist: Verify Your Template Works
To ensure your AI Social Media Campaign Planner runs smoothly, check these five essential elements:
- ✅ Trigger Node: Are all required inputs (Brand Name, Content Goals, Industry, etc.) filled out?
- ✅ OpenAI-0: Is the output from this node a valid, structured JSON Array of planned posts?
- ✅ Posting Frequency: Does the number of generated posts match your Campaign Timeline and Posting Frequency (e.g., 4 weeks at 2 posts/week = 8 total posts)?
- ✅ OpenAI-1: Is the post copy natural, friendly, and does it include the required CTA?
- ✅ Google Sheets Connection: Is your google_sheets_p-0 node correctly authenticated and pointing to the right Sheet ID and Worksheet ID?
FAQs
Q: Can I change the posting frequency after the plan is created?
A: Not directly in the middle of the workflow. You must update the posting_frequency value in the initial trigger node and re-run the workflow. The openai-0 node will then regenerate the schedule based on the new frequency.
Q: How do I add another social media platform, like Instagram?
A: In the trigger node, select "Instagram" under the Main platforms input. Crucially, you should also update the prompt in the openai-1 node to include specific writing guidelines for Instagram (e.g., focus on visual hooks, use more line breaks/emojis) so the copywriter generates platform-optimized text.
Q: The captions are too long. How can I make them shorter?
A: Edit the prompt in the openai-1 node. Look for the "Writing Guidelines" section and change the instruction: Keep the content short and impactful (100–150 words) to a lower range, like (50–80 words).
Q: I want to use GPT-4 instead of GPT-5-mini. Where do I change the model?
A: You can change the model in the settings panel of each OpenAI node (openai-0, openai-1, and openai-2). In the data section of these nodes, look for the "model" key and update its value to "gpt-4o" or your desired model

Elevate Your Content Strategy with AI Automation
Diaflow helps marketing teams escape the manual grind of content planning and focus on strategic engagement. Our no-code automation, combined with specialized AI prompts, lets you instantly generate a complete, structured posting plan across LinkedIn, Facebook, and more.
Whether you're planning for one client or ten, Diaflow eliminates scheduling errors, maintains brand voice consistency, and scales your content output without adding headcount. Start with this template today and transform your social media operations. Save time, reduce friction, and make automation your competitive advantage.