Because manually tracking payment requests is about as fun as doing taxes with a broken calculator
Ever found yourself drowning in payment request emails, sticky notes, and that one colleague who always "forgets" to submit their receipts properly? Well, grab your favorite productivity beverage because we're about to build an automated Payment Request System that will make your accounting team weep tears of joy.
This tutorial will walk you through creating an end-to-end workflow that collects payment details, formats them professionally, stores everything in a database, and sends notifications automatically. Think of it as having a super-efficient assistant who never takes coffee breaks and always remembers to follow up.
What You'll Build
By the end of this tutorial, you'll have a complete Payment Request System that:
- Collects structured input from users through a clean interface
- Automatically timestamps every submission
- Formats and validates all data using AI
- Stores everything in an organized database
- Sends professional notifications to relevant parties
- Provides clear status updates for transparency
The best part? Once it's set up, it runs completely on autopilot. No more chasing people for missing information or wondering if that expense report from three weeks ago ever got processed.
Ready to get started? Create your free Diaflow account and build this workflow in minutes, not hours.
Step 1: Create the “Payment Request” Table
Before building the workflow, we need a table to store all requests.
In Diaflow Tables, create a table with the following columns:
- username → requester’s full name
- email → requester’s email address
- amount → payment amount (in VND or other currency denominations)
- reason → short description of the request
- incurred_date → the date the expense occurred
- attachment → link to uploaded receipt/invoice file
- submitted_date → the date the request was submitted

This table becomes your single source of truth for all payment requests. No more scattered emails or lost paperwork.
Step 2: Collect User Information
Now we need to gather all the necessary details from users. Add a Trigger Node that captures these specific inputs:
Required Fields:
- Username (short text): Keep it simple, just first and last name
- Email (short text): For notifications and follow-ups
- Payment Request Amount (number, in VND): The actual amount they're requesting
- Reason (long text): Detailed explanation of why they need the money
- Incurred Date (date, format: MM/DD/YYYY): When the expense occurred
- Attachment (file): Supporting documentation in PDF, PNG, JPG, JPEG, or WebP format
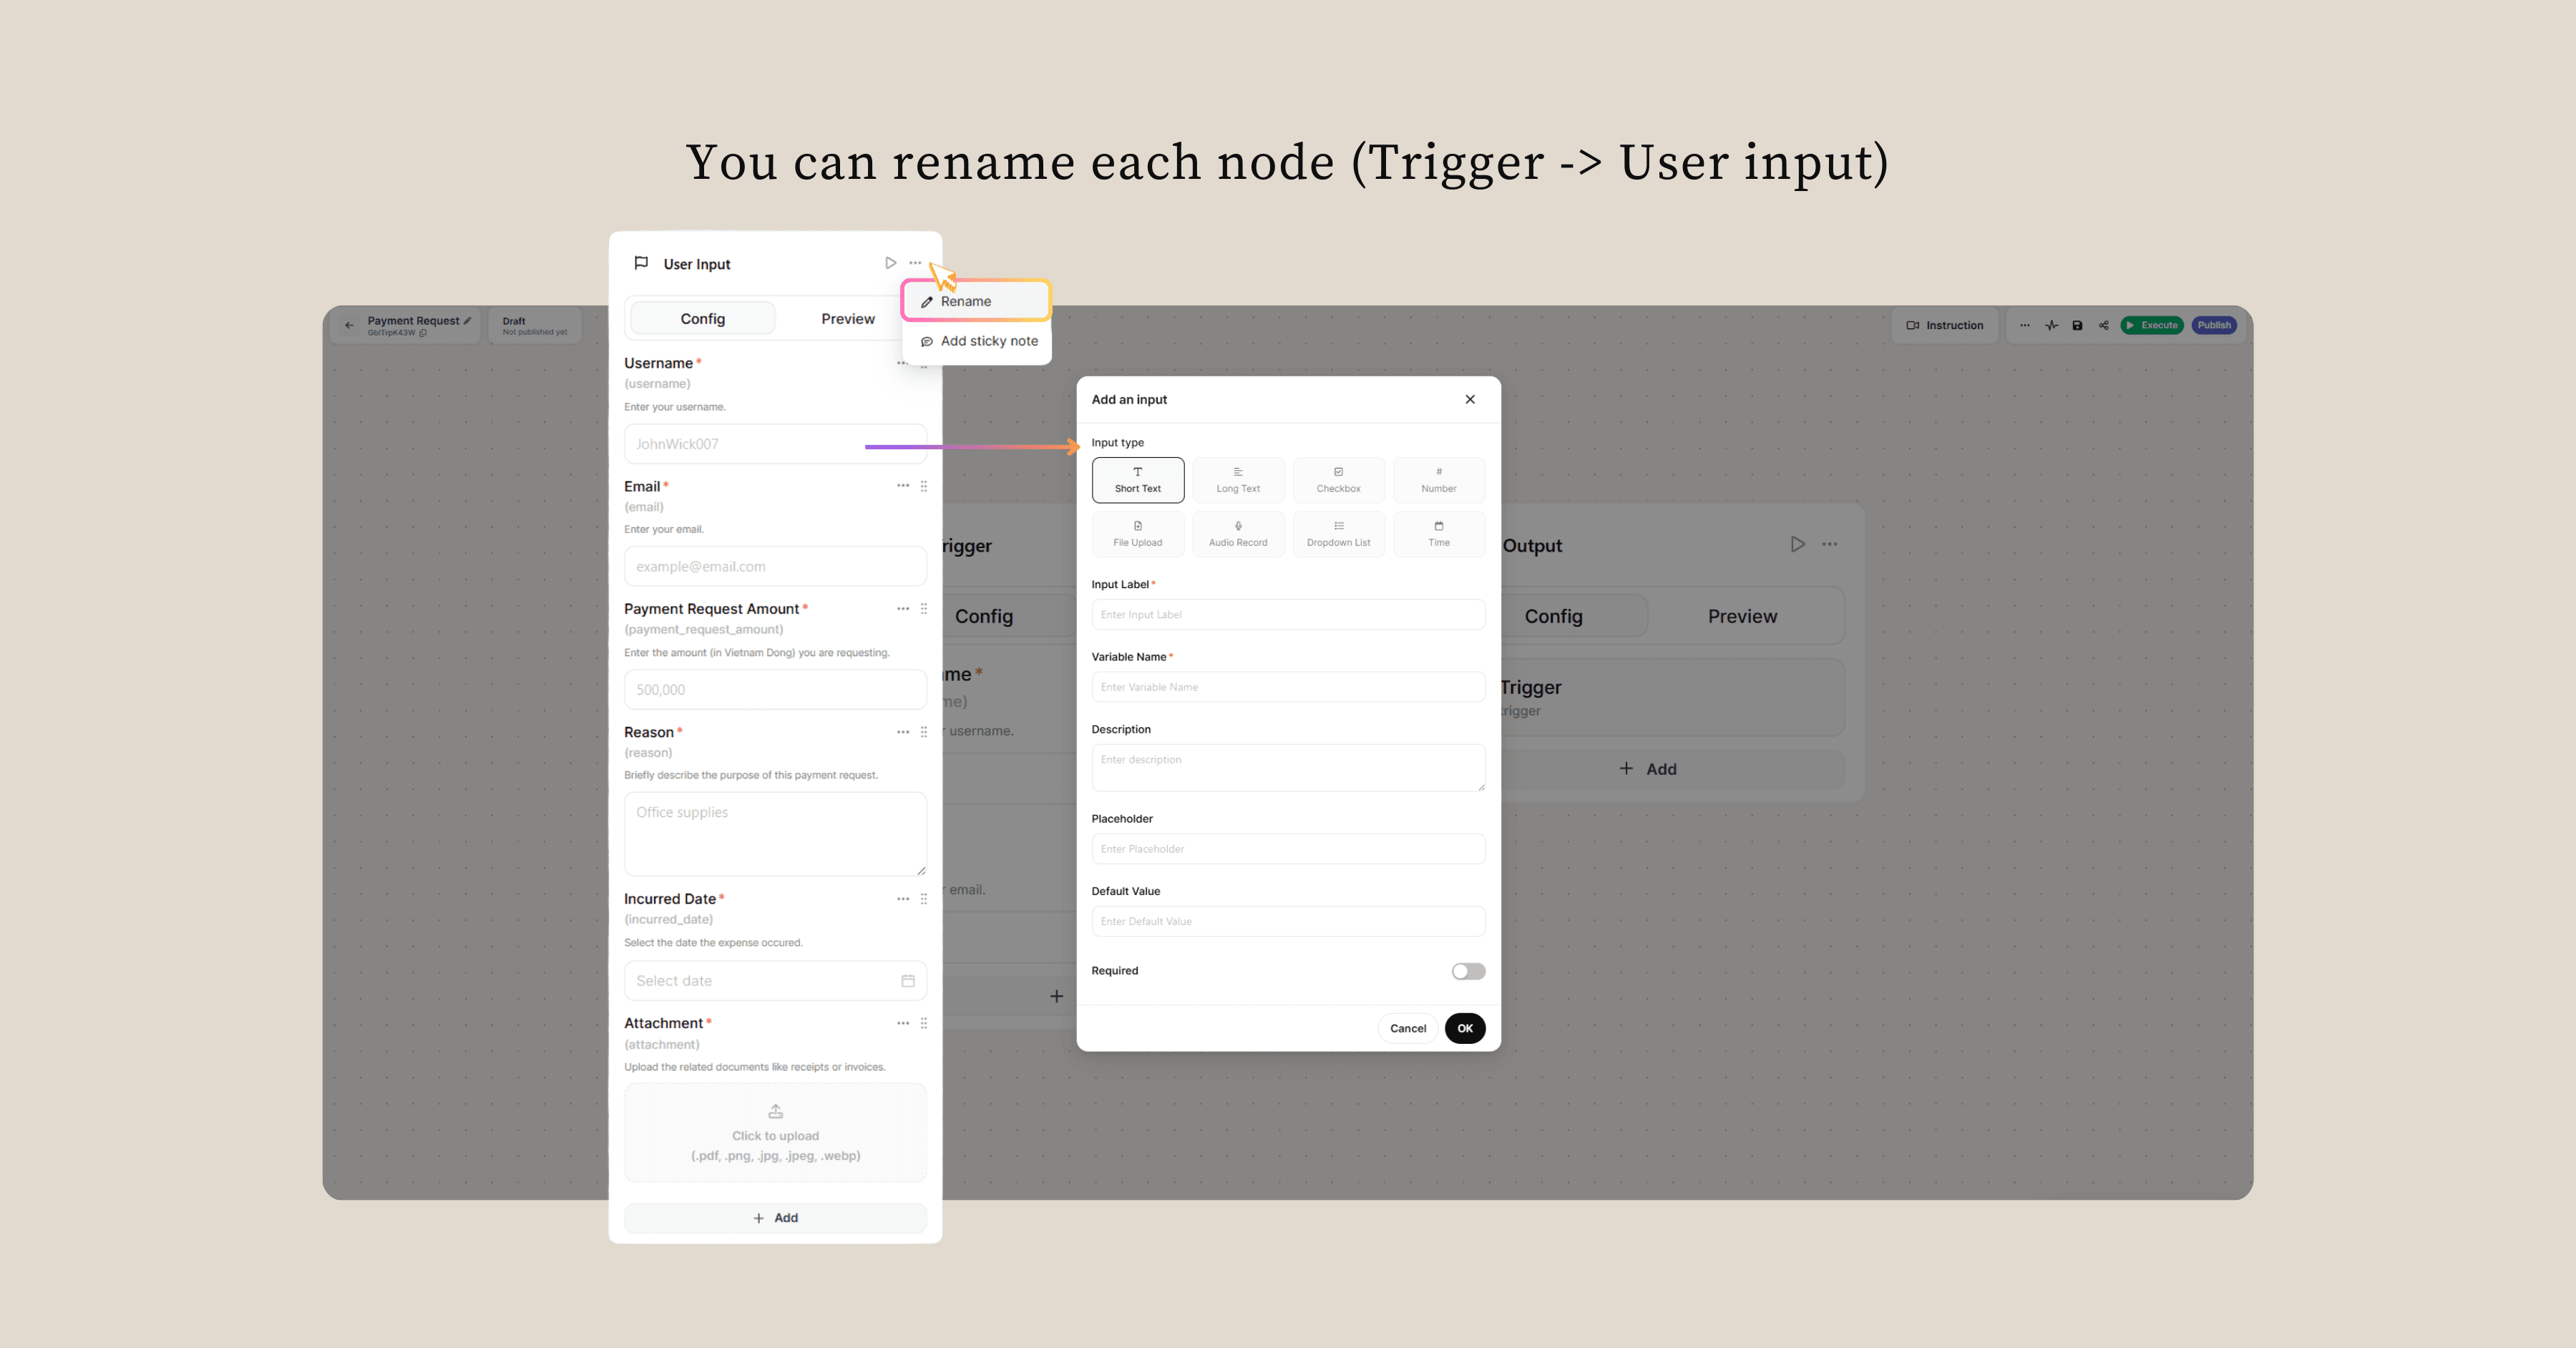
Why These Fields Matter: The trigger acts as your digital bouncer, making sure everyone provides the minimum required information before entering the system. No incomplete requests means no headaches later when you're trying to process payments.
Pro Tip: The attachment field is crucial. Having digital receipts attached directly to each request eliminates the "I'll send it later" problem that haunts every accounting department.
Step 3: Add Automatic Timestamping
Insert a Date-Time Node to automatically record when each request was submitted. Configure it with these settings:
- Date Format: MM/DD/YYYY
- Time Format: HH: mm
- Timezone: +7 (Vietnam timezone)
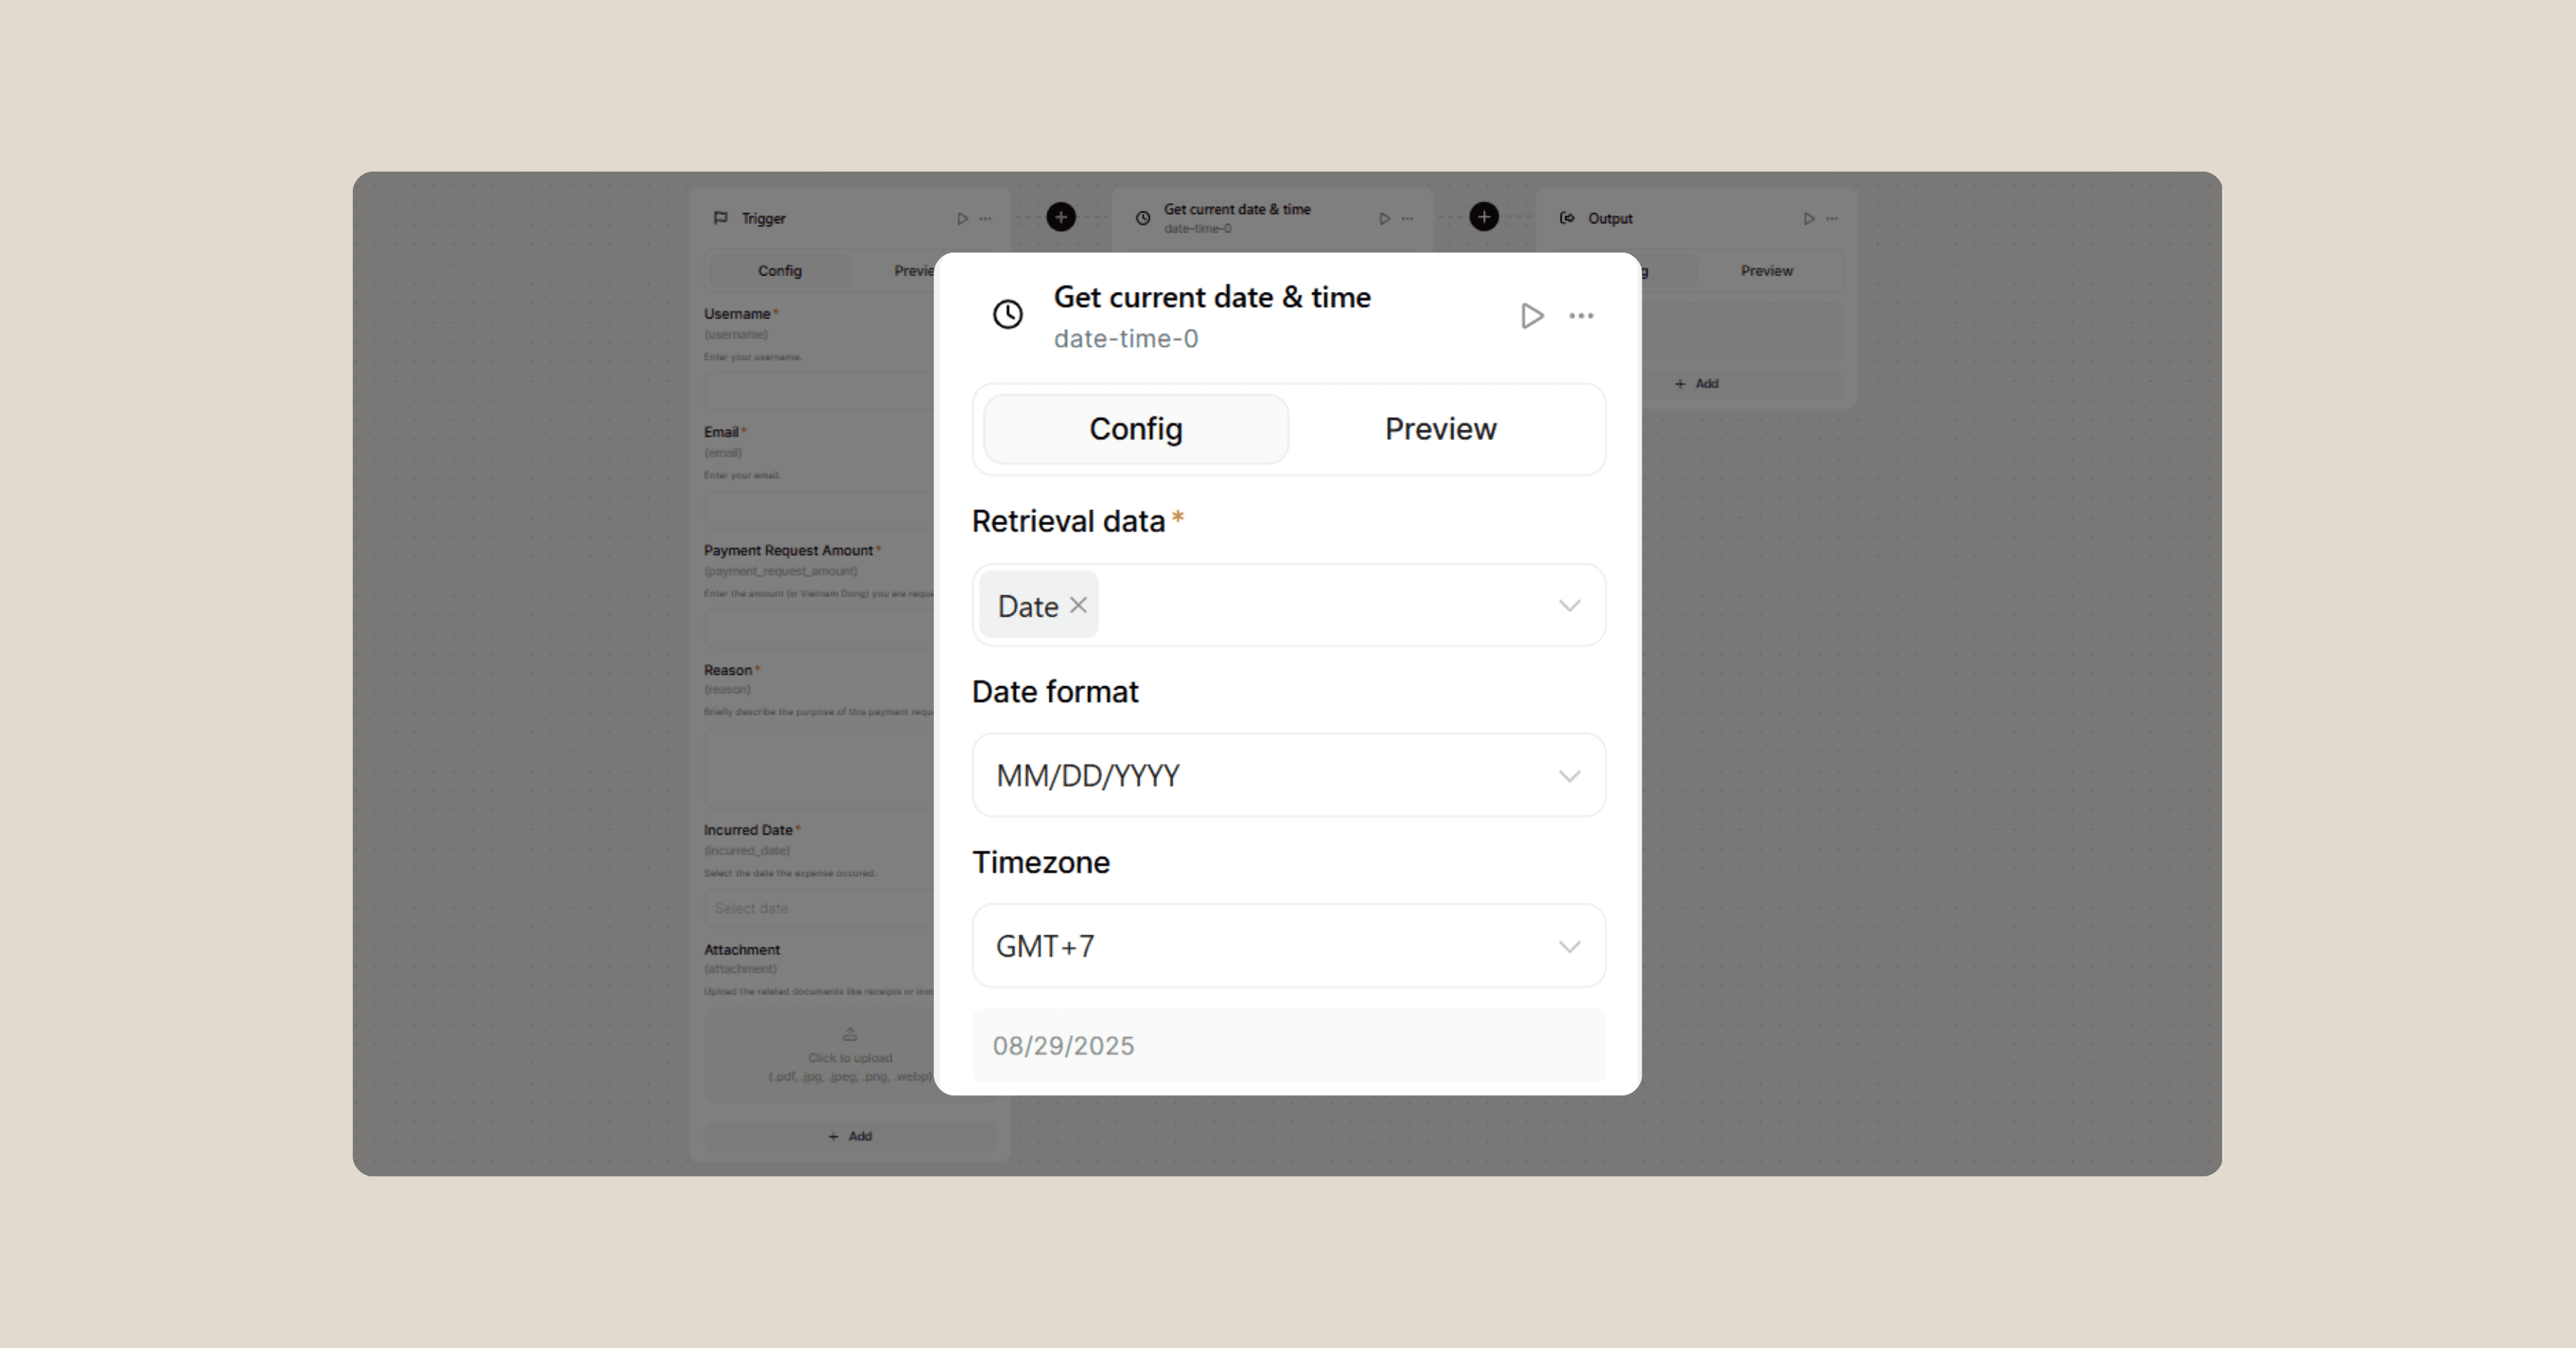
Why Automatic Timestamps? Because asking humans to manually enter the current date is like asking them to remember where they put their keys. It's theoretically possible, but why risk it? Automatic timestamping ensures every request has accurate submission timing without relying on user input.
This timestamp becomes invaluable for tracking response times, analyzing submission patterns, and maintaining audit trails for accounting purposes.
Step 4: Merge and Format Your Data
This is where things get organized. First, add a Merge JSON Node to combine all your collected values into a single, structured object:
Inputs to Merge:
trigger.username
trigger.email
trigger.payment_request_amount
trigger.reason
trigger.incurred_date
trigger.attachment
date-time-0.output
Next, add an OpenAI Node to clean up and standardize the data format. Use this prompt:
You are provided a JSON file: {{data-json-0.output}}
Return directly in JSON format, do NOT use Markdown based on this structure:
{
"username": string,
"email": string,
"amount": integer,
"reason": string,
"incurred_date": YYYY-MM-DD,
"attachment": string,
"submitted_date": YYYY-MM-DD
}
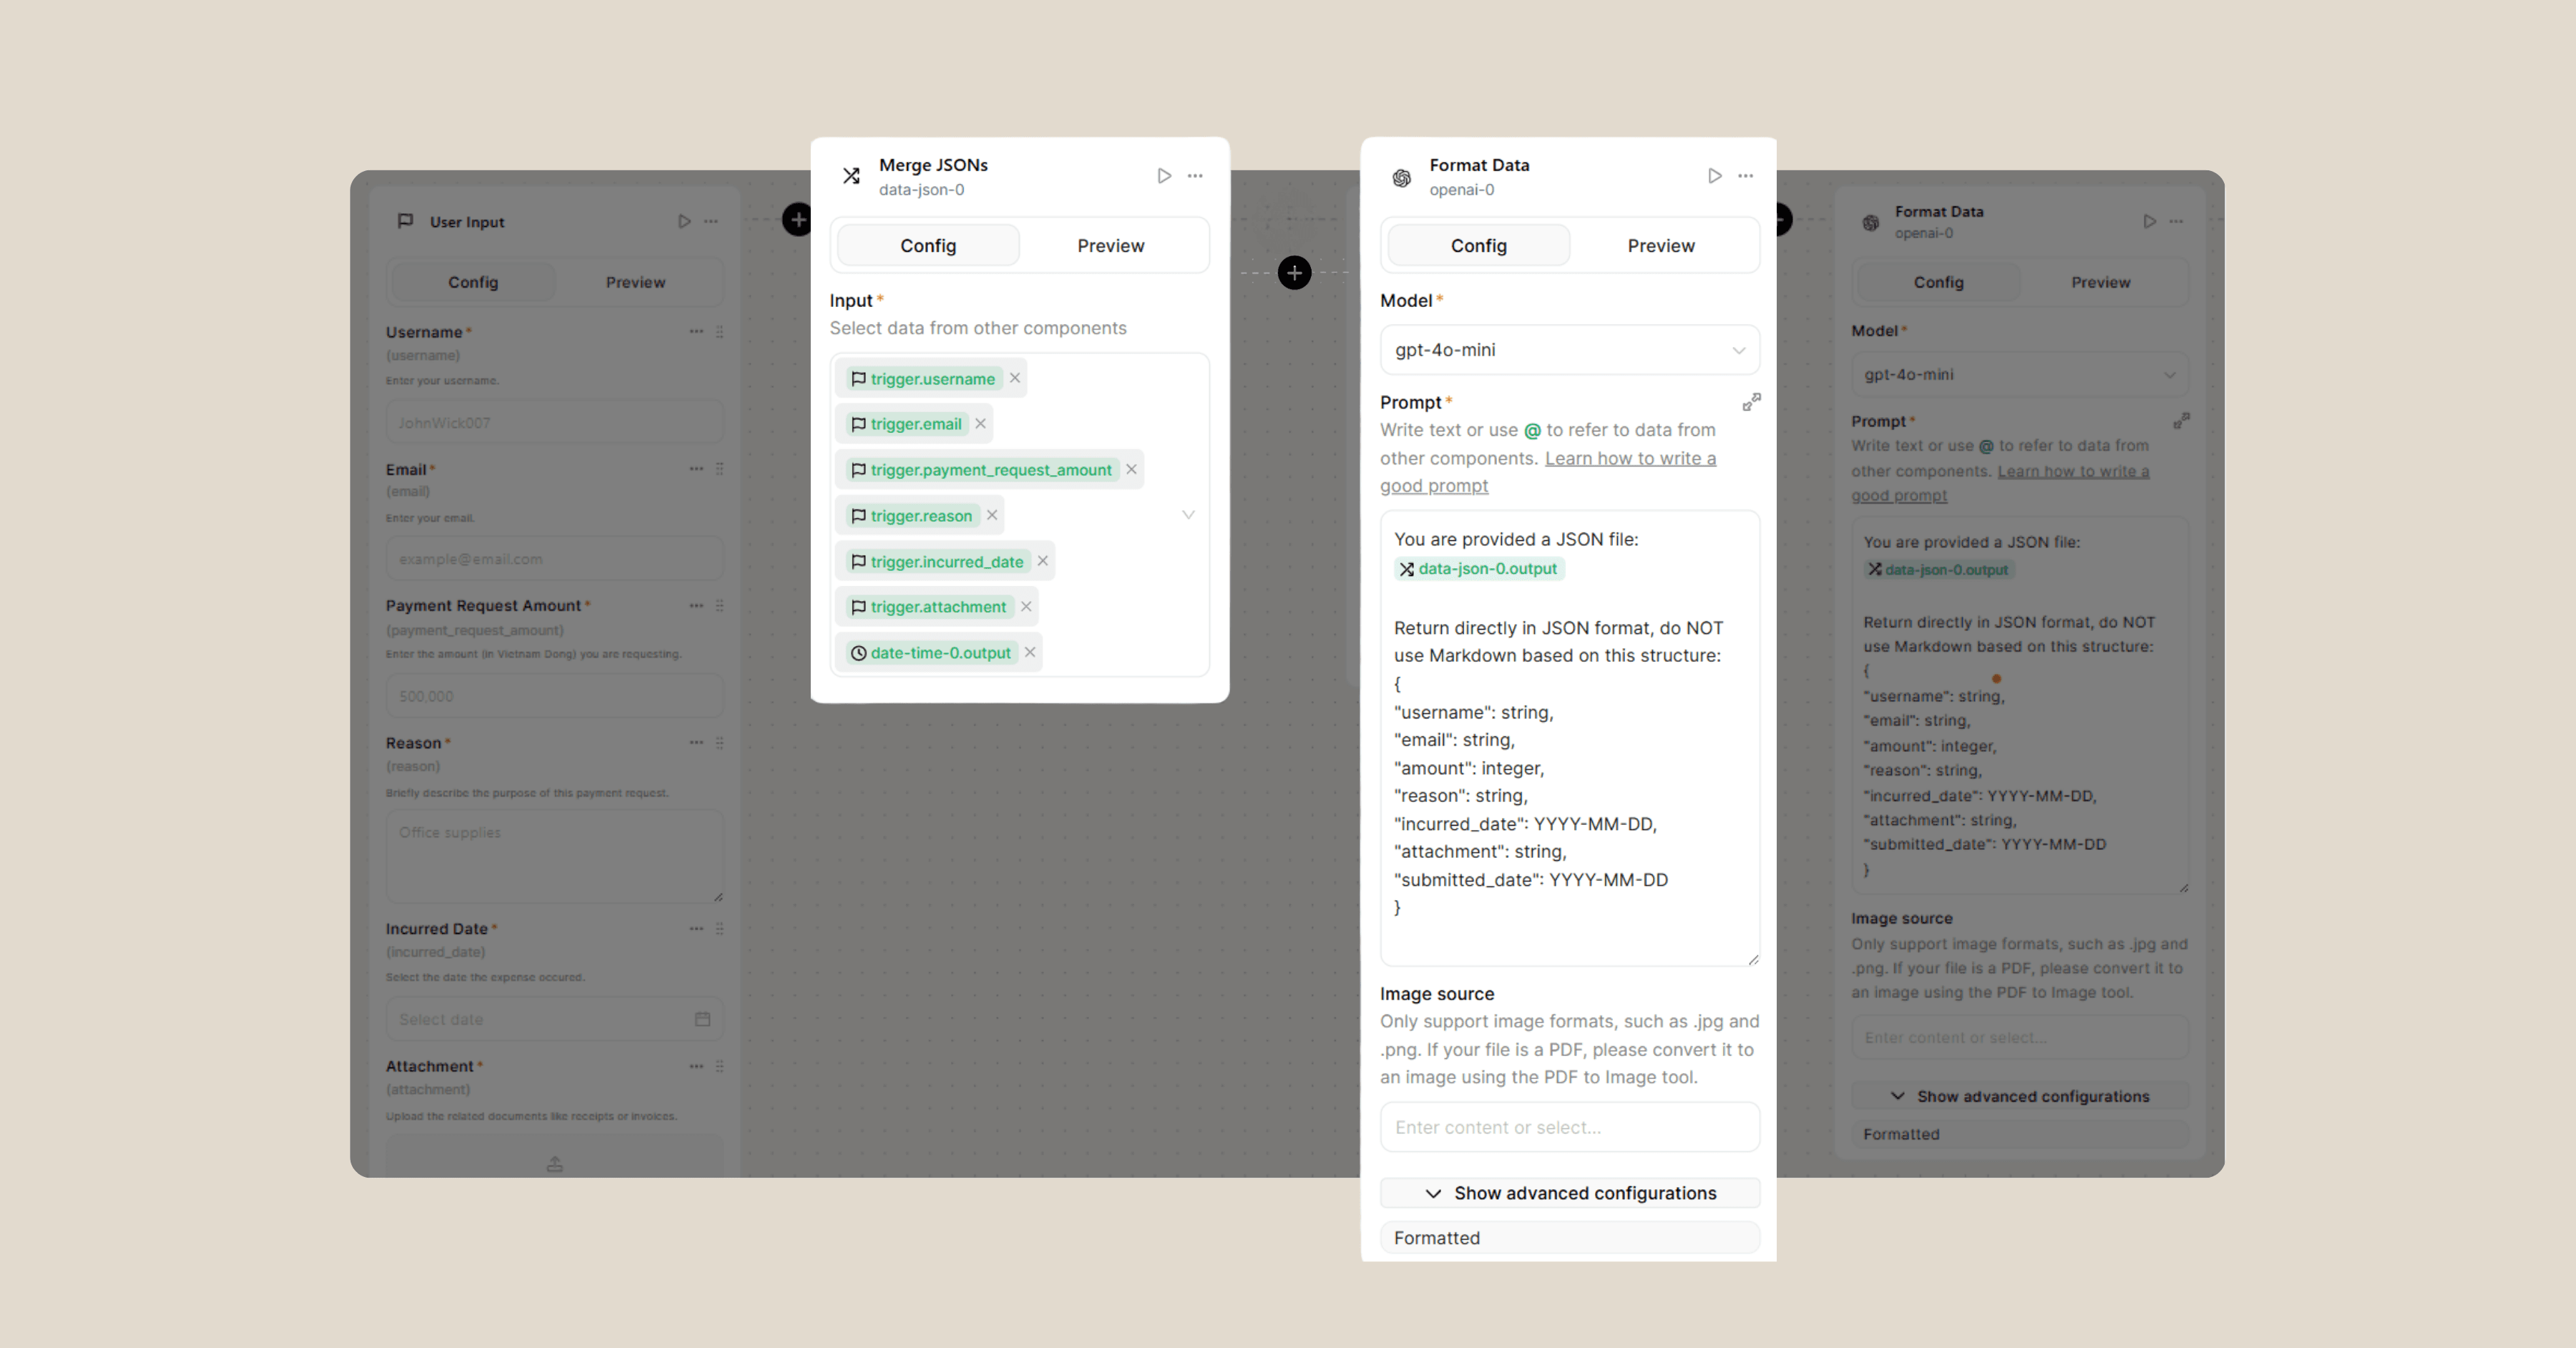
What This Accomplishes: The AI acts as your data janitor, making sure everything is properly formatted, consistent, and ready for database storage. It converts dates to the correct format, ensures amounts are properly typed as numbers, and validates that all required fields are present.
This step eliminates the common problems of inconsistent data entry that can break database operations or cause processing errors later.
Step 5: Store Everything in Your Database
Add a Database Node (DDB) and connect it to the table you created in Step 1. The beauty of this step is its simplicity: the AI automatically generates the appropriate SQL INSERT command based on your formatted JSON data.

What Happens Here: Your clean, formatted data gets permanently stored in your database table. Each payment request becomes a searchable, trackable record that won't get lost in email threads or forgotten in someone's inbox.
Database Benefits:
- Searchability: Find any request by user, amount, date, or reason
- Reporting: Generate summaries, trends, and analytics
- Audit Trail: Complete history of all payment requests
- Integration: Easy to connect with accounting software or reporting tools
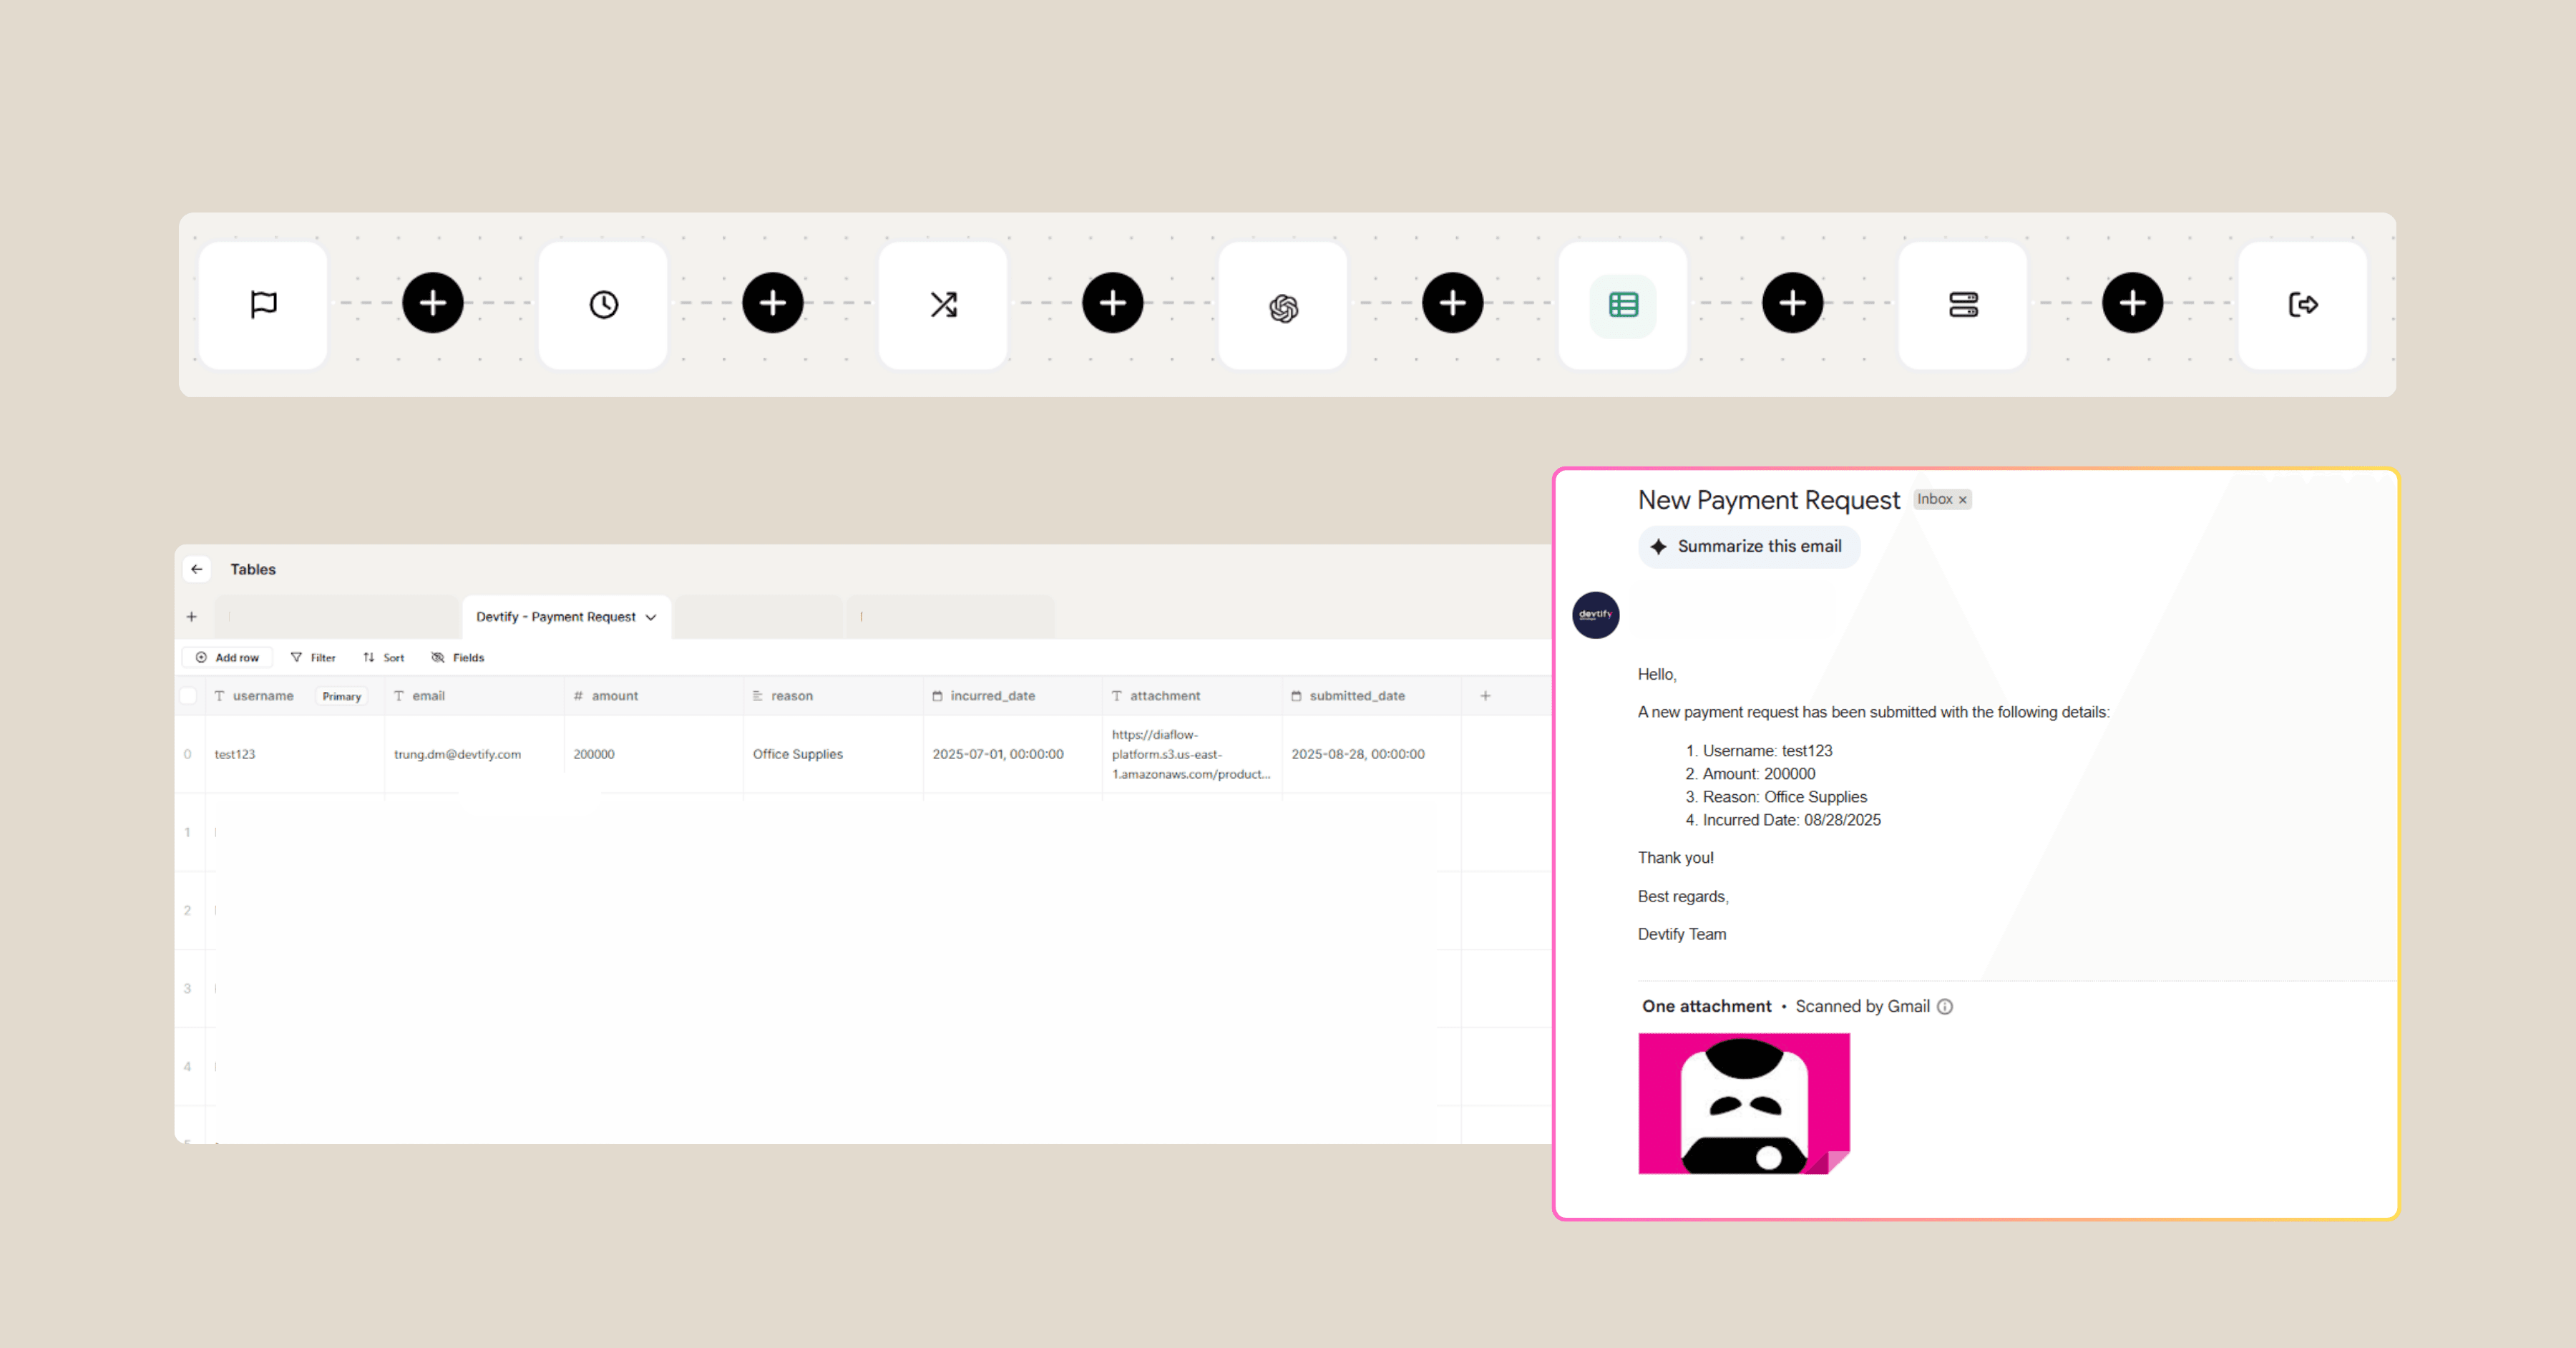
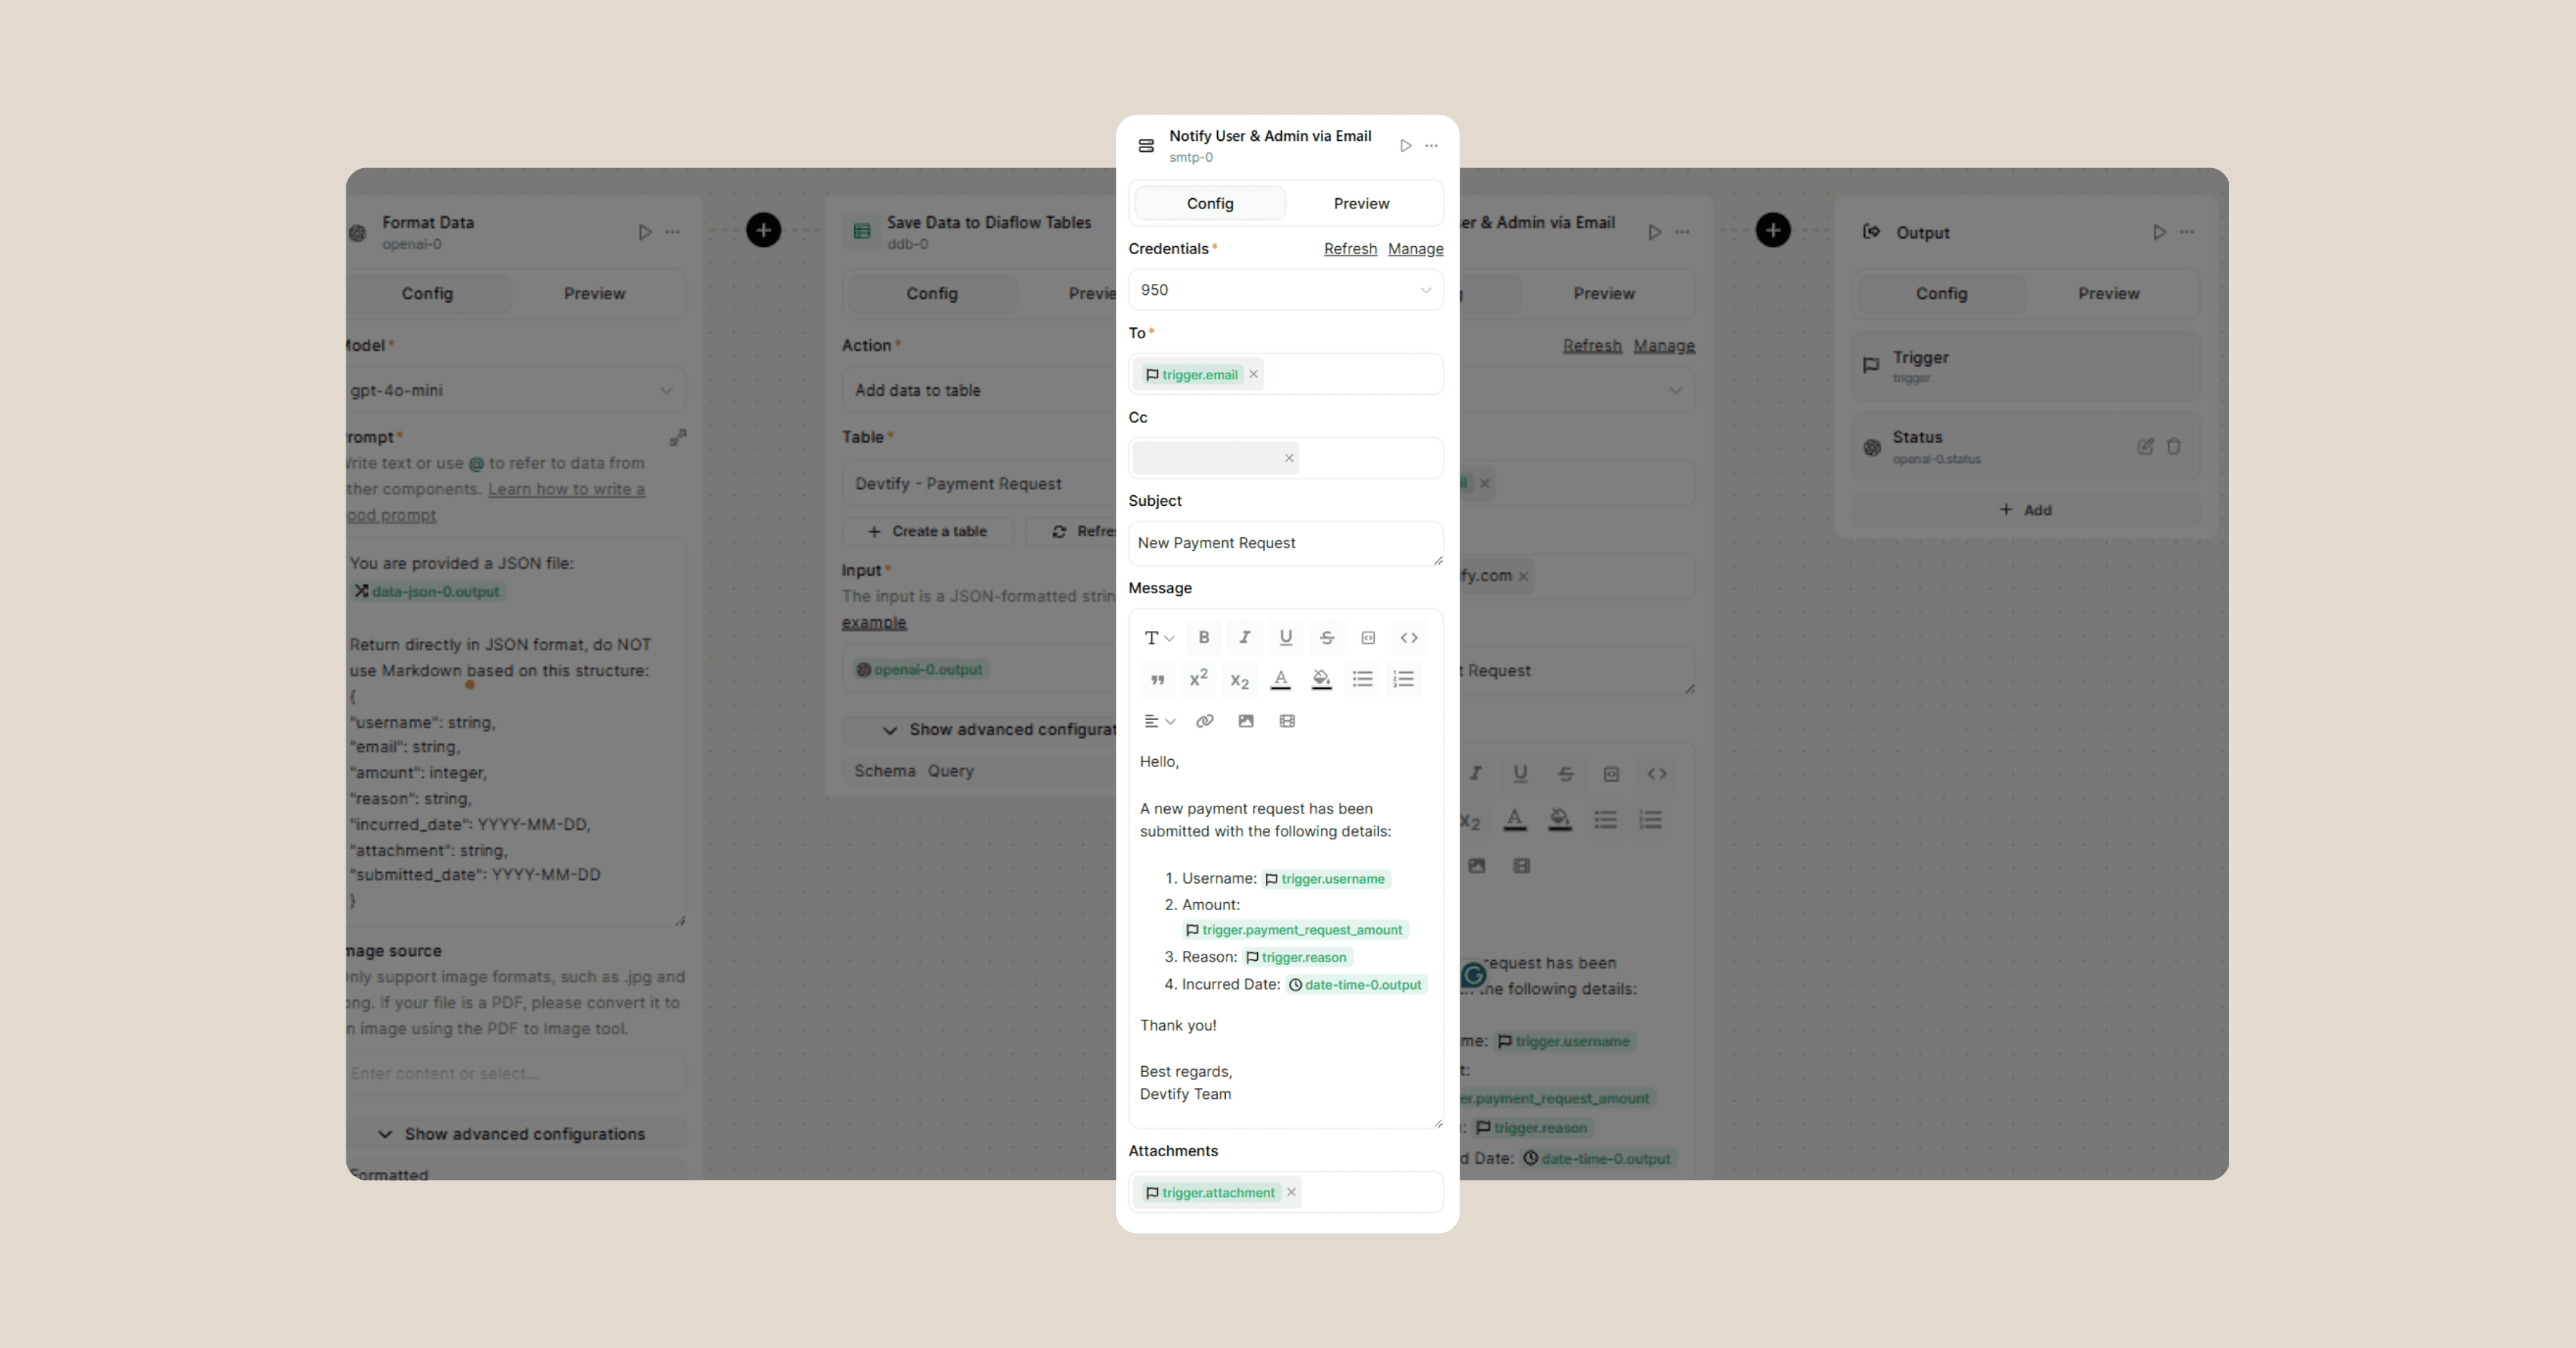
Step 6: Send Professional Notifications
Add an SMTP Node to keep everyone in the loop. Configure it with these settings:
- Credentials: Add your own API key
- Subject: New Payment Request
- To: {{trigger.email}}
- CC: [email protected]
- Attachments: {{trigger.attachment}}
Email Template:
Hello,
A new payment request has been submitted with the following details:
1. Username: {{trigger.username}}
2. Amount: {{trigger.payment_request_amount}}
3. Reason: {{trigger.reason}}
4. Incurred Date: {{date-time-0.output}}
Thank you!
Best regards,
[Your team]
Why Email Notifications Matter: Instant notifications keep the process moving smoothly. The requester gets confirmation that their submission was received, while administrators get immediate alerts about new requests requiring attention. No more "Did you get my request?" follow-up emails.
Advanced Email Features:
- Attachment Inclusion: Original receipts are forwarded automatically
- Professional Formatting: AI generates properly structured messages
- Multiple Recipients: Both user and admin stay informed simultaneously
Step 7: Provide Clear Status Output
Finally, add an Output Node to display the workflow result:
- Status: {{openai-0.status}}

This gives users immediate feedback about whether their submission was successful, providing closure to the request process and reducing uncertainty.
What You've Accomplished
Congratulations! Your Payment Request Workflow now operates as a complete, automated system that:
For Users:
- Provides a simple, structured way to submit payment requests
- Automatically handles timestamps and formatting
- Sends immediate confirmation of submission
- Includes all necessary documentation in one place
For Administrators:
- Creates organized database records for easy tracking
- Generates professional notification emails automatically
- Maintains complete audit trails for accounting compliance
- Eliminates manual data entry and formatting tasks
For Your Organization:
- Reduces processing time for payment requests
- Minimizes errors from manual data handling
- Improves transparency in the expense reimbursement process
- Creates searchable historical records for analysis
Best Practices
User Training: Provide clear instructions on acceptable attachment formats and required information. Create examples of good vs. poor request descriptions.
Regular Maintenance: Monitor database storage usage, review email delivery logs, and update notification recipients as team members change.
Security Considerations: Implement appropriate access controls for database viewing, ensure attachment scanning for malware, and maintain backup procedures for critical data.
Conclusion
Building this automated Payment Request System transforms a typically tedious administrative process into a streamlined, professional operation. No more lost receipts, forgotten follow-ups, or manual data entry errors.
Your team can now submit expense requests quickly and confidently, knowing that everything will be tracked, documented, and processed efficiently. Meanwhile, your accounting department gets organized data and clear audit trails without additional manual work.
The beauty of automation isn't just the time saved; it's the consistency and reliability it brings to essential business processes. Every request follows the same path, gets the same level of documentation, and receives the same professional handling.
Now stop manually tracking expense receipts and let your workflow handle the paperwork while you focus on more strategic tasks. Your future self (and your accounting team) will definitely thank you!
FAQs
Q: How long does it take to set up this workflow?
A: Once you have your Diaflow account ready, the entire workflow can be built in 15-20 minutes. Most of that time is spent configuring the database table and email settings.
Q: Can I modify the workflow for different currencies besides VND?
A: Absolutely! Simply update the currency field in your trigger node and modify the email template to reflect your preferred currency. The system will handle any currency format you specify.
Q: What happens if someone submits a request without an attachment?
A: The workflow will still process the request, but the attachment field will be empty in your database. You can modify the trigger node to make attachments required if your company policy demands them.
Q: Can multiple people access the same database table?
A: Yes, Diaflow supports multi-user access to database tables. You can control permissions to ensure only authorized personnel can view, edit, or delete payment request records.
Q: Is there a limit to how many payment requests the system can handle?
A: Diaflow scales automatically based on usage. The system can handle hundreds or thousands of requests without performance issues, making it suitable for organizations of any size.
Q: Can I integrate this workflow with my existing accounting software?
A: Yes! Diaflow offers various integration options including APIs and webhooks that can connect to popular accounting platforms like QuickBooks, Xero, or custom enterprise systems.

Beyond Payment Requests: Other Workflows You Can Automate with Diaflow extraSectionContent:
If building an automated Payment Request System just saved you hours of manual work, imagine what else you can streamline. With Diaflow, the possibilities go far beyond finance workflows:
Automated Meeting Notes: Turn raw audio into polished meeting minutes in minutes. Check out the step-by-step guide →
Customer Onboarding Flows: Collect user info, validate details, and send welcome emails automatically.
Invoice Processing: Extract data from invoices, store it in your database, and trigger timely reminders.
Marketing Campaign Automation: Connect signup forms, CRMs, and email tools to build a no-code marketing pipeline.
The best part? All of this can be set up in just a few minutes using Diaflow’s drag-and-drop interface—no coding required.
👉 Ready to build your next workflow? Sign up for a free Diaflow account and explore our growing library of ready-to-use templates to get started faster.